Monday, April 21, 2014

Flipbook

The cabinet is finished and has made itself quite at home in the corner of my dining room, but I've got just one more post about it: I want to chronicle the process, from start to finish, in photos. So here you have it: the visual record of seven months of Saturdays. Enjoy!


Fin.


Sunday, April 06, 2014

The Finish Line

This is a picture of a pretty-much-almost-done china cabinet in its new habitat, hulking darkly in the corner of my dining room and looking pretty much like, well, a china cabinet. If you find this a little surprising, I can assure you that you're not the only one. 


Mom and Dad dropped it off a few Thursdays ago, along with the last of the blue paint and some well-wishes: after some preventive planing and hinge-tweaking, we left the bottom doors to settle before committing to finishing the edges. Three weeks later, they're all painted up, and  they open and close like a dream, but let's all knock on (poplar) wood just in case, shall we?


Scraping paint off the glass, or off the wood you just touched up? Surprise! Sometimes it's the same thing!


Hey, so it turns out china cabinets can be, like, hold dishes and stuff! And with that, fourteen months after moving in, the guest room is free of the tyranny of The Box. Give me your poor, your huddled egg coddlers, yearning to breathe free!


All put away, with a little room to grow on.


Today, I did the very last no-really-it's-done-this-time step: I bought some #8 wood screws and some washers and installed the wine-glass rack right over the gun rests. I did not drill through the bottom of the upper cabinet, which I would like added to my tombstone, please. On a related note, my wine glasses are enormous and do not want to be friends, but they will just have to get over it. 


So here we are: after many months and many weekend hours and much inhaled sawdust, I am the owner of a finished china cabinet built by my dad's and my own hands out of my friend's late grandmother's gun rack. You know, like you do.


The truth is that I love it even more than I expected to: it's exactly what I was thinking of, standing on Grandma Ann's lawn back in July, only better. I'm so grateful to my dad for jumping in and spending his Sunday afternoons (not to mention a few Niner games, which I offered to let him watch) in the garage with me, talking sense and making sure I didn't lose any limbs to the circular saw. It's a beautiful cabinet, and it makes me very happy, in no small part because it makes me think of those days. 

So this is the end—almost. I'm planning one more photo post, chronicling the entire process from start to finish. And then I will probably just go and make some coddled eggs and tea and light some candles and put a few flowers in glassware, just because I can.

Tuesday, March 11, 2014

Farewell to Frankencabinet

It's alive. It's ALIVE!

And all it took was a month and a quart of paint.

In recent weeks, the cabinet has gone from this:


to this:


This is one coat of primer and two painstaking coats of Benjamin Moore Advance in Hale Navy talking, and what they are saying is, I AM ALMOST DONE.

There's still detail work to be done: untaping, fishing the newspaper out of the gun rests (you can't see it, but they're painted white, in preparation for lining with paper/fabric/other items I can change according to my whim), putting the door pulls back on, and installing a rack for wine glasses on the underside of the upper cabinet. You might notice in the second picture that the edges of the lower cabinet doors are unpainted; they've shifted again and don't close, which we think we can fix by re-tightening the hinges after they've been untaped, but we've left the door open (heh) for further sanding and adjustments to the doors themselves, just in case.

But I've got some big news: after seven months and many, many weekend hours, the cabinet is coming home! This Thursday, my parents will load it into my dad's pickup truck and deliver it to my dining room ("room" being a loose term in this instance), where it will finally relieve the giant moving box in the guest room of the title of Holder of Decorative Kitchen Things. I gave Dad the go-ahead to take care of any little things he thinks might be easier at his house than at mine, including futzing with the doors; I'm not sure what I'll find on Thursday, but I'm excited to find out. Whatever it is, I'll report back.


Sunday, February 09, 2014

So Come On, Rest Your Guns With Me

There are lots of reasons I decided, on a Saturday last July, that I was going to make a gun cabinet into my new china cabinet. It was the right size, for one thing. I had been looking for something unusual I could use as extra kitchen storage, and this certainly fit that particular bill. And I thought it would be a fun project with my dad. But really, the way to my heart was through the gun rests. And there you have it: I'm a sucker for a nice ("nice") piece of artillery storage, which is something I never thought I'd say.

But really: they're gun rests. I, Elizabeth Ball, a person who catches spiders in a designated drinking glass and delivers them safely outside, have a place to rest my guns, should I so choose. Even better, I by "guns," I now mean "teacups." This is consistently happy-making.

Second, I like the way they look. They come in different sizes and shapes: big and oval on one end; narrow and straight-edged on the other. I think they're supposed to come in just two shapes, but they're hand-cut and a little irregular, and so they all look like they could be intentionally different. I don't know anything about which guns fit in which rests, but I don't really get tired of thinking about them.

So: I like my gun rests. I just don't have any idea what to do with them.

Originally, they were lined with some genuinely grody pieces of outdoor carpet.


Now they're not.

But what's a girl to do, decorationally, with the gun rests on her china cabinet? (File under: "unique Pinterest searches.")

My original plan was something gun-related: artillery-print fabric to line them, maybe. A little gun-related china-cabinet humor for you, right? I could still do this. Etsy, as one would expect, has me covered.

But now I'm considering going the other direction, and trading the gun theme for something completely unrelated. I could paint them a contrasting color, or find a pattern I like, to make them stand out. I could paint them with flowers; I'm picturing a Scandinavian-style floral pattern. I could just paint them to match the rest of the cabinet, and make fabric liners to match my mood. Or I could just let them blend in.

It's the last big decision to make about this project, and I haven't made up my mind. Internet, what would you do?

Wednesday, January 29, 2014

Cracked!

If you're looking for the story-within-a-story in this gun-cabinet-to-china-cabinet process, it's got to be the glass door I bought for the upper cabinet. It took a long time and lots of salvage-store trips to find; it fits the rest of the cabinet suspiciously well; it makes the difference between a shelf and a cabinet. If you couldn't tell already, I'm a big fan of this door.

Since October, the door has been sitting in my parents' garage, leaned up against the work bench right in the middle of the action, where my mom has been warning somebody not to break the glass at least once per weekend day. Note: This will be important later.

Last weekend, it finally came time to hang the door. Before we broke out the drill and hinges, I decided to prep it for eventual painting: take the old hinges off, rough up the finish with the electric sander, and make a hole for the new door pull. Best to take care of the prep work before it's attached to anything, right?

I've spent a lot of quality time with the electric sander over the last six months, and made basically-invisible changes to a lot of boards. (Is it square now? Now? What about now? Like...now?) This was not that kind of sanding. The finish on the door came off with satisfying ease, and it looked different. I started with the flat surfaces, then started getting into the corners and molding around the small panes. Visions of taping and painting danced in my head. And then:

CRACK.

Here is the secret to safely sanding around a pane of glass with an electric sander: use the corners of the sandpaper. Don't use the sides--there are just too many points of contact and too much vibration. (Also, humility. Don't get cocky, kid.) I know this because I was sanding away, and the sander shuddered against the glass, and the upper-left small pane broke from corner to corner.


To me, this looks like the end of the world. How do I fix broken glass? Are there elves involved? Do I need magic jewelry to make this happen? Surely there's no store for this kind of thing. There you have it: after a long search and a semi-miraculous moment of door acquisition and months of skirting around it, I had somehow done the irreparable. With the sander, too. I always thought it would be my uneasy ally, the table saw!

To my dad, thankfully, this does not look like the end of the world. We pried off the wooden frame and took the rest of the pane out, and Dad saved one of the broken pieces as a sample for the guy at the glass store (...that apparently exists). Then he remembered that he had this kind of glass stashed away somewhere, waiting for a rainy day, or for someone to make a careless move with the electric sander. Mom says he's already cut it to fit. 

As I write this, that pane of glass is still missing. I'm nervous about nailing the frame back into place (yes, let's swing hammers near the new glass, shall we?), but Dad swears it'll be easy. In any case, we kept going. The door is up. We're getting closer.  


More later!

Monday, January 13, 2014

When God Closes a Door, Sometimes It Shifts and Stays Closed Forever

Let's talk about doors.

Here's the thing about doors: if you want them, you're going to have to hang them. Gravity is not going to help you.


Originally, the gun cabinet had drawers on the bottom. They were big, and deep, and mostly impractical for storing fragile objects, and would have ended up a mess every time I went looking for the fancy salt and pepper shakers. When Dad and I broke out the graph paper, the drawers were the first to go.

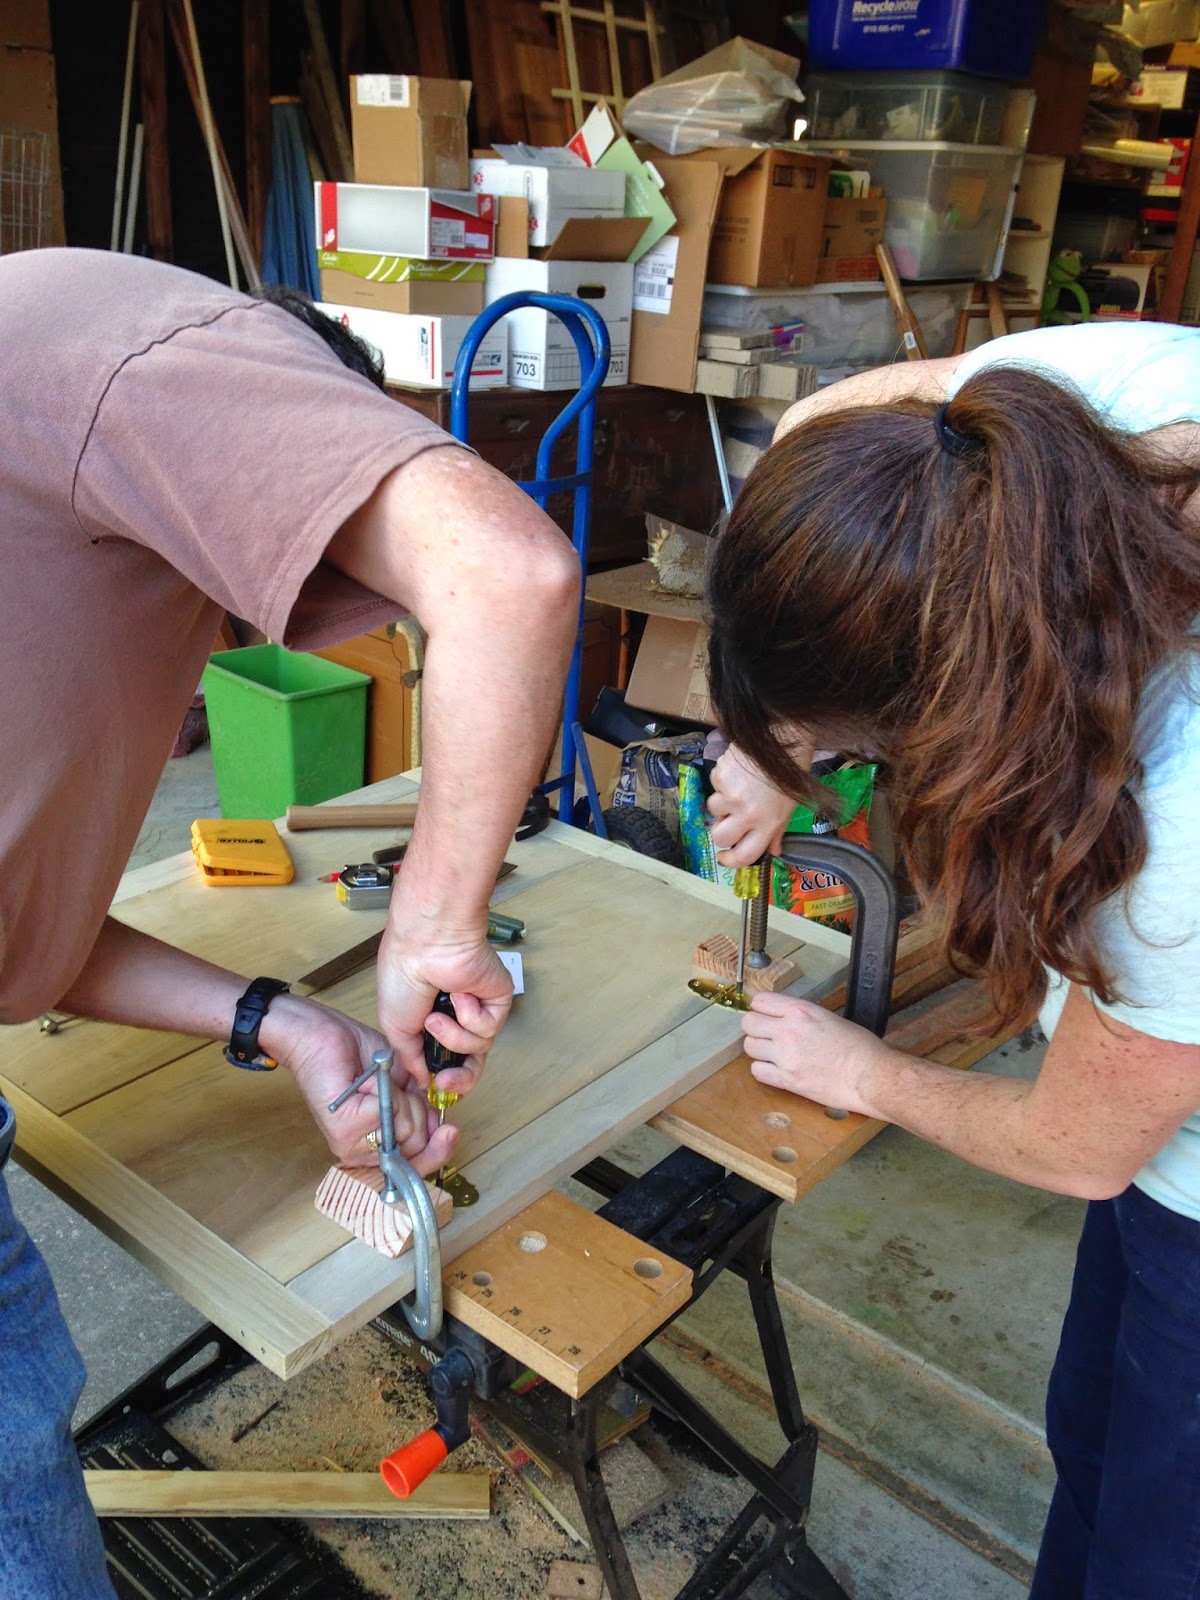
We cut new cabinet doors out of poplar, and I have to tell you: two rectangular pieces of wood can look the same, and have the same measurements, and they can be as twinsy as you think they're going to get, down to the thirty-second of a single inch, and you can line them up and find that they are TOTALLY DIFFERENT. We swapped them, spun them around, and flipped them over, lather, rinse, repeat. With time and the eventual use of cleverly deployed pencil marks ("left" "right" "front" "back" "top" "bottom," like a bunch of geniuses), and also some quality time with the electric sander, we found a configuration that seemed to work: two doors that matched in length and cleared the frame we'd built for them, and didn't scrape on each other when they closed. Before anything could shift, we placed the hinges and screwed them in. 


It worked!


For awhile. 

Here's a life lesson: the doors you have hung, which swing so freely in their frame, may be less graceful when they're bearing the stresses and pressures of a plywood rifle cabinet of undetermined age. The new doors worked when we attached them to the cabinet, but when we came back the next week, they'd warped--or, more accurately, the frame around them had shifted. We counter-stressed the rest of the cabinet with a brace and a small bucket of wood glue, but no luck. They catch and creak. 

We'll have to fix them, probably using the sander to smooth out any high spots. For now, though, we're leaving them as they are--there's no use fixing them before we're done with the rest of the cabinet, when any false move might throw them out of alignment again. 


But let's end with a happy story, shall we?

Back in July, as soon as the $25 for the cabinet was out of my hands, I started hunting for a vintage glass door to enclose the top half. This led me to cabinetry lesson #5,297: most glass cabinet doors are already attached to cabinets. 

I spent an entire weekend in September looking, browsing the architectural salvage and furniture-resale shops of the East Bay, then trolling Etsy, then giving up and going to eBay. I had people hunting for me, stopping into garage sales and thift stores. I found a merchant in Ohio that specialized in glass doors and stained-glass windows, and gave myself a $100 budget (not including shipping!) for something we might be able to repurpose. I spent weeks waiting for their inventory to change.

One day, I was errand-hopping my way across the East Bay, racing the clock before dinner reservations with my parents. I had stopped in to Ohmega Salvage--both sides--without luck, and was running out of time. I decided to call it quits and head to dinner.

Instead, I found myself at Urban Ore, running to the cabinet-door aisle just in case. I'd been there before, armed with gloves and a tape measure, and rifled through the ranks of abandoned pressboard and broken glass, and found nothing. By this time, I was getting late for dinner, and thinking I should have just headed off to meet my parents--but there I was. And there, sitting out in the middle of the aisle, was exactly one glass cabinet door with exactly the right dimensions and more or less the style I wanted. No broken panes, real wood, solid construction, not an obvious tetanus risk. Twenty-one dollars, including tax, and no need for shipping from Ohio.

I had it home before the appetizer course.

Now that it's home, the door is cooling its heels: it'll be the last big piece of the cabinet and the last thing that might throw the other doors out of whack, after we install the upper shelves. It's a good one, though. I'm glad I was late for dinner.

Saturday, October 26, 2013

Prep

The journey to a handmade china cabinet begins, as so many journeys do, with a single step trip to Home Depot. Dad and I spent an entire afternoon shopping for materials and considering the upsides and downsides of all kinds of wood, from pine to redwood to the entire contents of our local lumberyard's Unaffordable Hardwoods aisle. We eventually decided to make what we could from poplar, which at the time mostly reminded me of the most underrated Anne of Green Gables book, but is also apparently a good cabinetry-grade wood; we also chose three-quarter-inch AB plywood (top-quality on one side, slightly messier on the other) for the bigger pieces, plus a starter course of twelve feet of quarter-round molding for trim and internal supports.


Sadly, nobody had anticipated the vast market for people turning old gun cabinets into china cabinets, and thought to make all these pieces in exactly the sizes I needed. It turns out cabinetry is like sewing in that way: before the putting-together phase comes a lot of prep. Dad and I spent at least a month of weekends prepping wood. We measured and marked. We re-measured and re-marked. We ripped boards the long way, then cut them off the short way. We rasped. We sanded. We checked for square corners again and again and again. In one case, we did it all wrong, and made an emergency trip to Home Depot. I made friends with the electric sander and the miter saw and sometimes the table saw, especially if its friend the ripping guide was present. (One way cabinetry is not like sewing: sewing machines sew straight on their own.) In total, I got more sawdust in my sinuses than I would previously have associated with the average weekend project.


Let's face it: wood prep isn't that photogenic. It's exacting, precise work, minus the satisfaction of putting stuff together (and having it stay that way). I'm glad it's mostly over--but I'm also glad I did it. Back when I was hunting for a china cabinet, before I ever laid eyes on this $25 worth of plywood gun-cabinet glory, I knew I wanted something unique and interesting and personal--and now I feel like I really know my materials. I know where they're square (and, more importantly, where they're not square), where there used to be dings and scuffs and the occasional saw-burn mark, how deep that little knot actually went, and how much sanding it took to get it out, and how far I distributed the divot to make it less noticeable. Despite the assembly portion of the process, this is no IKEA purchase* (Bonus: Don't just assemble your furniture; complicate your life by cutting all the wood first! This is what they call WINNING). Maybe I'm just turning into Gwyneth Paltrow or something, and will now be required to name my kid something like Plate McGee, but I like that this cabinet and I are feelin' each other now.

Next up: Let's put stuff together (and have it stay that way)!

*Nothing against IKEA purchases; without them, I would have no place to sit/eat/keep anything. But: you know. Something should be made from real wood and weigh less than Andre the Giant.